Globe SIM Registration Online Step-By-Step Guide
Globe SIM Registration is needed because of the SIM Registration Act, which helps enhance security and prevent crimes like financial fraud and SIM-aided criminal activity. You can use the GlobeOne app or the Globe portal to register your SIM card. Some users may worry about giving personal information, like a photo ID or residential address, but this is done to keep your data secure. The law, Republic Act 11934, signed by President Ferdinand “Bongbong” Marcos Jr. on October 10, 2022, asks users to share accurate details. It started in December 2022 to protect people from scammers, spammers, and other suspicious users. If you follow these easy steps, the process is safe, quick, and convenient.
You must register your Globe SIM card if it was bought before December 27, 2022, to avoid penalties or losing your mobile services. Don’t worry if you find it hard! It’s simple: send a valid ID, make sure your details are complete, and confirm them online. Globe Telecom has made everything reliable and secure, so your mobile services are safe. If your details change, like your last name or address, you can update them up to two times a year.
By following these steps, you can stay protected, enjoy the Philippine law, and keep enjoying your phone without problems!
Step-By-Step Guide for Globe SIM Registration
Globe provides two easy ways to register SIMs: the online portal and the GlobeOne app. Follow this simple guide to complete your Globe SIM registration quickly and smoothly.
Globe SIM Registration Via Official Link: Step-by-Step Guide
For Prepaid Users
Step 1: Visit the Globe SIM Registration Portal


Access the Globe SIM Registration Page by going to the official SIM registration website using your browser. This portal is designed to ensure a fast and convenient registration process.
Step 2: Enter Your 10-digit Mobile Number.
Input your 10-digit mobile number (e.g., 9171234567) in the provided field. Click on the “Register Globe SIM” button.

Step 3: Receive and Verify the OTP
Check your messages for the One-Time Password (OTP) sent via SMS. This OTP is valid for five minutes. Enter the 6-digit OTP on the portal to validate your number and move to the next step.


Step 4: Fill in Personal Information
Provide the required personal information, including:
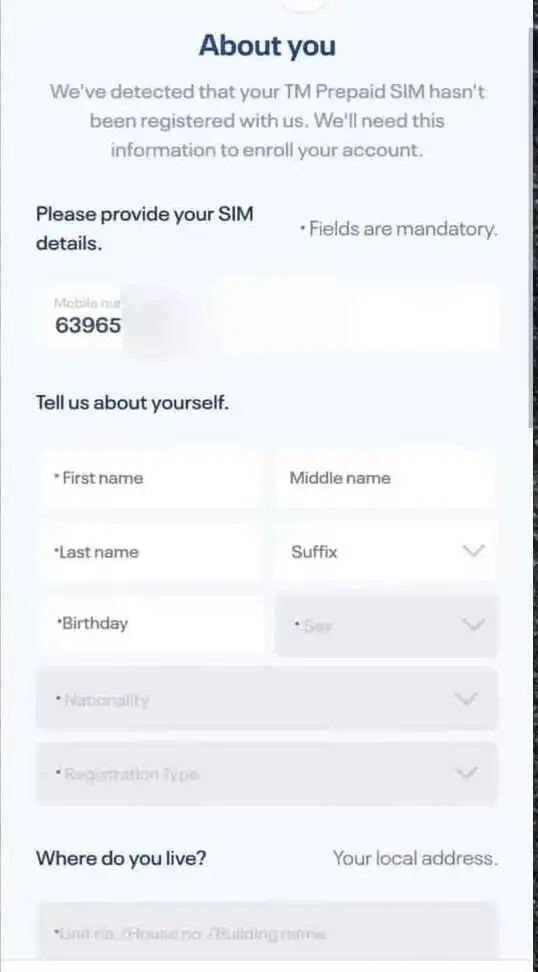
- Full name
- Birthday
- Gender
- Residential address
- Nationality
Step 5: Upload Government ID and Selfie
Take a clear selfie and upload a valid government ID. Choose from options like a passport, driver’s license, or senior citizen’s card. Make sure the uploaded image is less than 2MB and clearly visible. Use live photo capture technology if required by the portal to ensure security.

Step 6: Agree to Privacy Notice and Attestation
Tick the checkbox to agree to Globe’s Privacy Notice and confirm the attestation of the completeness and accuracy of your details.

Step 7: Submit the Registration Form
Click “Submit” to finish the registration. Once completed, a reference number will appear on your screen as proof of your successful registration. Save this number for future use.

Step 8: Registration Confirmation
You’ll see a confirmation message on the SIM registration website. Your user data is protected with advanced encryption protocols for maximum security.

For Postpaid Users
Step 1: Receive Notification from Globe
Globe will send an SMS reminding you to confirm or update your SIM registration details. Follow the instructions in the message.
Step 2: Confirm or Update Information
If your details are correct, text SIMREG to 8080 to confirm your registration. If updates are needed, visit the nearest Globe store for assistance.
Step 3: Update Personal Information
Provide any necessary changes to your personal information, such as:
Step 4: A new residential address.
Change in last name after marriage or legal processes.
Step 5: Submit a Valid Government ID
Submit an acceptable ID such as a passport, national ID, or senior citizen’s card. Globe ensures your documents are safeguarded against misuse with limited retries for uploads.
Step 6: Validation and Confirmation
Globe will validate your information. Once approved, you’ll receive a confirmation via SMS. Your details will be securely stored in their registration system.
Globe SIM Registration Via GlobeOne App: Detailed Step-by-Step Guide
By completing these steps, your Globe SIM Registration is now secure, verified, and compliant with the SIM Registration Act. Keep your SIM active and enjoy uninterrupted services.
Step 1: Download the GlobeOne App
Download the GlobeOne App from the official app store on your Android or iOS smartphone. Make sure to install the latest version for a seamless experience.
Step 2: Log In or Create an Account
Open the app and either log in with your existing credentials or create an account if you don’t already have one. Follow the on-screen prompts to set up your account.

Step 3: Navigate to SIM Registration
In the Home section of the app, locate the “Register your SIM” option. Tap on it to begin the registration process.
Step 4: Enter Your Phone Number

Input your Globe SIM Number (10-digit mobile number) in the required field. Tap the “Register SIM” button to proceed.
Step 5: Receive and Verify OTP

Check your phone for an OTP (One-Time Password) sent via SMS. Enter the 6-digit OTP into the app within five minutes. This step ensures secure verification of your number.
Step 6: Fill Out Personal Details

Complete the form by providing the following personal details:
- Full Name
- Birthday
- Gender
- Residential Address
- Nationality
Step 7: Choose an ID Type

Select an appropriate ID type from the list of acceptable options. This includes:
- Driver’s License
- Passport
- Senior Citizen’s Card
- Philippines Identification (National ID)
- And other valid IDs such as GSIS e-Card or Voter’s ID.
Step 8: Upload the ID Image and Take a Selfie
Upload a clear photo of your valid ID. Ensure the image is under 2MB and easy to read. Then, take a selfie to confirm that the ID belongs to you. This process uses live photo capture technology to enhance security.
Step 9: Review and Agree to Terms

Check the box to agree to the terms and conditions, including Globe’s Privacy Notice and the attestation of the completeness and accuracy of your details.
Step 10: Submit Registration
Click the “Submit” button to complete the process. The app will confirm your registration and display a successful verification message.

Step 11: Save Your Reference Number
A reference number will appear on the screen. Save this as proof of your successful registration. It will be helpful if you need future support or verification.
Troubleshooting
If the registration fails:
- Retry the final steps.
- Ensure your ID photo and selfie meet the app’s requirements.
- If issues persist, contact TM SIM Registration support or visit a Globe store for assistance.
Registering Your Globe SIM In-Store
Globe SIM Registration can be done in-store for those who prefer a face-to-face process. This method is simple and ensures your compliance with the SIM Registration Act. Follow these steps carefully.
- Visit a Globe Store
Find the nearest Globe store or authorized outlet. Use the store locator on the GlobeOne App or the official website. - Bring Your Required ID
Prepare a valid government ID, such as a Passport, Driver’s License, or Philippines Identification (National ID). Ensure your ID is clear and valid for verification. - Fill Out the Registration Form
Provide your personal details, such as name, address, and phone number, on the form provided by the store. Double-check your information for accuracy. - Submit Your ID for Verification
Hand over your ID to the representative. They will verify your identity by matching the information on your form with your ID. - Complete the Registration Process
The representative will process your details and confirm your registration. You will receive a confirmation via SMS or a receipt once the process is complete.
By registering your SIM in-store, you can ensure your account is secure, verified, and active without interruptions.
Required Documents
| Requirement | Description |
|---|---|
| Your Name | Full name of the registrant. |
| Date of Birth | Your complete birth date. |
| Nationality | Your nationality or citizenship. |
| A Selfie Photo | A recent photo of yourself. |
| Valid ID Card | Any nationally accepted ID with a corresponding ID number. |
| Your Globe SIM Card | The SIM card to be registered. |
| Active Globe Number | Your active mobile number. |
| Government-issued IDs |
|
How to Check if Your Globe SIM is Registered?
Ensuring your Globe SIM Registration is complete keeps your mobile services active and safe. You can check your registration status using these simple and reliable methods.
Method 1: Via GlobeOne App
- Open the GlobeOne App on your phone.
- Log in with your mobile number.
- Check the status beside your 10-digit Globe number:
- The orange exclamation mark means unregistered.
- The blue checkmark means registered.
- This method is secure, fast, and simple.
Method 2: Via Globe SIM Registration Portal
- Visit the Globe SIM Portal at new.globe.com.ph/simreg.
- Enter your 10-digit Globe number.
- Check your messages for a 6-digit OTP sent to your phone. Enter it on the portal.
- After verification, your status will appear:
- If registered, you’ll see “Your SIM is registered.”
- If not, you’ll see steps to complete the process for TM SIM Registration or new Globe registration.
- This method is accurate and works for both Prepaid and Postpaid users.
Method 3: Via Contacting Globe
- Visit the official Globe Facebook page.
- Chat with a customer service agent and ask to check your registration status.
- Provide the required details:
- Name
- Address
- Birthday
- Mobile number
- The agent will verify and confirm if your SIM is registered or not.
- This is a personal and secure option.
Method 4: Via Globe Store
- Locate the nearest Globe Store using queue.globe.com.ph/qflow_abs.
- Visit the store and provide your 10-digit Globe number, name, address, and ID number.
- The staff will check your SIM’s registration status.
- This in-person method is free, and local, and ensures your verification.
By following these steps, you can ensure your SIM is secure and active, avoiding interruptions to your service.
How to Check LTE at Home Registration via SMS
To verify your Globe LTE at Home SIM registration through SMS, follow these simple steps:
- Wait for a Confirmation Message
Globe will send you a text message prompting you to confirm your registration details. - Send Confirmation SMS
Reply to the message by texting:
SIMREG <ACCOUNT NUMBER> <WIRELESS LANDLINE/SUPER HOME PHONE NUMBER> to 268204. - Receive Confirmation
After sending your response, you will receive a message confirming that your LTE at Home registration is complete.
By completing these steps, you ensure your LTE at Home service stays active and compliant with registration requirements.
Problems in Sim Registration
Facing Issues with SIM Registration? Many users encounter common problems during SIM registration, such as delays in OTP delivery, incorrect personal information, or challenges in verifying valid IDs. These issues can disrupt your service and lead to compliance risks. Understanding the causes and solutions can help you complete the process smoothly. Visit our detailed guide to learn how to resolve these problems and ensure your SIM is registered without hassle.
Gifts After Globe SIM Registration
After completing your Globe SIM Registration, you can enjoy exciting gifts and benefits designed to make your experience better. Here’s what you might receive:
- Free Data
Use the internet to browse or stream with the free data Globe offers to registered users. - Bonus Load Credits
Get extra credits that you can use to call, text, or subscribe to promos. - Special Offers
Access exclusive discounts on Globe services or products once your registration is complete. - Added Account Security
Your account becomes safer after registration, protecting it from unauthorized use or fraud.
Make sure your details are accurate during registration to claim these benefits. For updates or more details about gifts, check the official Globe website or contact support directly.
Extra Tips for Globe SIM Registration
- Keep Your ID Handy
Always have your valid ID, such as a Driver’s License, Passport, or National ID, ready before starting. This will help you avoid delays. - Choose the Easiest Option
Use the GlobeOne App or Globe SIM Portal for a fast and simple process. These official channels are reliable and secure. - Check Your Network Signal
Ensure a strong signal when using online options. Weak signals can delay OTP delivery or form submission. - Double-Check Your Information
Make sure your name, address, and ID number match your documents. Errors can cause rejection or delays. - Save the Reference Number
After registering, save the confirmation or reference number. This proves your registration is complete. - Visit a Globe Store for Help
If online methods fail, visit a nearby Globe Store. The staff can assist you with the process and resolve any issues. - Keep Your ID Photo Clear
Ensure that ID images are not blurry or too large. Use good lighting and check the size before uploading. - Act Before Deadlines
Register early to avoid penalties or interruptions. Deadlines are strict and should not be missed. - Ask Questions
If you’re unsure, reach out to Globe support through official channels for clear guidance. - Follow All Steps Carefully
Read each instruction on the app or portal before proceeding to avoid mistakes. Proper steps ensure quick verification.
Final Thoughts
Globe SIM Registration is needed to keep your mobile services active. It keeps your account safe, protects your personal data, and follows the SIM Registration Act. You can register using the GlobeOne App, the Globe SIM Registration Portal, or by visiting a Globe Store. The steps are simple and secure, so your information is safe.
When you register, you stay connected without any problems. You can also get free data and special offers. Whether you have a prepaid, postpaid, or LTE SIM, completing registration is quick and easy.
Also Explore TnT Sim Registration and Tm Sim Registration
Frequently Asked Questions
How To Change or Update Globe SIM Details?
To update your Globe SIM details, follow these simple steps:
1: Visit the GlobeOne App or the Globe SIM Portal.
2: Log in using your mobile number.
3: Navigate to the “Update Details” section.
4: Enter your updated name, address, or ID number as required.
5: Upload a clear photo of a valid government ID for verification.
6: Double-check all details for accuracy and click “Submit.”
You will receive a confirmation message once your details are successfully updated. For assistance, you can also visit the nearest Globe Store.
How to Check Balance in the Globe?
Checking your balance is quick and easy. Here’s how:
1: Via SMS: Text BAL to 8080.
Wait for a message showing your current balance and data usage.
2: Via the GlobeOne App:
Open the app and log in with your mobile number.
Your balance and active promos will appear on the home screen.
3:Via Dialing: Dial *143# on your phone.
Follow the menu options to check your balance.
Choose the method that works best for you. Each option is simple, reliable, and free of charge. For more detailed queries, visit the Globe portal or contact Globe support.
Q: What happens if I don’t register my Globe SIM card?
If you don’t register your Globe SIM card, your mobile services will be deactivated. This includes calls, texts, and internet access. Registration is required by the SIM Registration Act to prevent unauthorized use and fraud.
Q: Can I register multiple Globe SIM cards under my name?
Yes, you can register multiple Globe SIM cards. Each SIM must be registered separately using the Globe SIM Portal or the GlobeOne App. Ensure all personal details are accurate and consistent across registrations.
Q: How long does the SIM registration verification process take?
SIM registration verification is usually instant after the submission of correct information. In some cases, it may take up to 24 hours. Once verified, you will receive a confirmation message.
Q: What should I do if my SIM registration fails?
If your registration fails, double-check your name, address, and ID details for accuracy. Ensure the ID photo is clear and meets requirements. If the issue persists, contact Globe support or visit a Globe Store for help.
Q: For foreign nationals, can I extend my SIM usage beyond the 30-day period?
Foreign nationals can use their SIM for 30 days with a tourist visa. To extend usage, you need a visa extension and must update your registration. Visit a Globe Store with the necessary documents for assistance.
Q: What is the app for Globe SIM?
The official app for managing your SIM is the GlobeOne App. It lets you register your SIM, check balances, and manage your account. The app is free to download on Android and iOS.
Q: Can I register my SIM card online?
Yes, you can register your SIM online using the GlobeOne App or the Globe SIM Portal. Both platforms are simple to use and allow you to provide your personal details and upload your ID securely.
Q: Why do I need to register my SIM card for Globe?
SIM registration is mandatory under the SIM Registration Act. It ensures your SIM card is linked to your identity, keeping your account secure and reducing risks like scams or fraud.
Q: Is there a fee for SIM registration with TM or Globe?
No, registering your TM or Globe SIM is free of charge. You do not need to pay any fees to complete the process.
Q: What documents do I need to register my Globe SIM card?
You need a valid government ID, such as a Driver’s License, Passport, or National ID. Ensure the ID is clear and up-to-date to avoid issues during verification.
Q: How long does the SIM card registration process take?
The process is usually completed instantly, but in some cases, it may take up to 24 hours for verification. You will receive confirmation once it’s done.
Q: Can I register someone else’s SIM card on their behalf?
Yes, you can register another person’s SIM card if you have their name, address, and ID number. Some cases may also require an authorization letter and a copy of their valid ID.
Q: What happens if I don’t register my Globe SIM?
If you don’t register your SIM, it will be deactivated. This means you won’t be able to make calls, send texts, or use mobile data services.
Q: Where is the link for Globe SIM registration?
The official link for registering your Globe SIM is new.globe.com.ph/simreg. Visit this page to complete your registration online.
Q: How to check my SIM registration details online with Globe?
To check your registration details, log in to the GlobeOne App or visit the Globe SIM Portal. Enter your 10-digit mobile number and verify it with an OTP sent to your phone.
Q: What is the registration type in SIM card registration with Globe?
The registration type indicates whether your SIM is Prepaid, Postpaid, or a TM SIM. Select the correct type during the registration process for accurate verification.